SUSE 9.1 HOWTO
3rd September 2004
Introduction
With the default install, PPTP Client 1.4.0 and PPP 2.4.2 are included, as packages pptp-1.4.0-39 and ppp-2.4.2-39 respectively.
However, SUSE packaged the older format options file. A bug has been raised. To workaround this, edit the /etc/ppp/options.pptp file and change the MPPE options like this:
| from | to |
|---|---|
| mppe-40 mppe-128 mppe-stateless |
require-mppe |
Firewall
If you are using SuSE firewall in it's default state, you will not be able to make a connection. You must either turn it off by typing SuSEfirewall2 off, or reconfigure it as follows:
- open YaST,
- click on System which is on the left hand side,
- open the /etc/sysconfig Editor,
- click +Network then +Firewall then +SuSEfirewall2,
- add "1723" to FW_SERVICES_EXT_TCP,
- add "GRE" to FW_SERVICES_EXT_IP, FW_SERVICES_DMZ_IP, FW_SERVICES_INT_IP and FW_SERVICES_QUICK_IP (we're not sure if all four are required, it depends on where the server is in relation to your client, as far as the network interfaces are concerned),
- click FINISH.
Minimal Effort Installation
- download the configuration program pptp-php-gtk rpm
(mirror link)
and install it like this:
# rpm --install --nodeps pptp-php-gtk-20040102-rc1.i386.rpm Note: RPM will issue warnings and errors about the Red Hat specific /etc/security/console.apps directory, but we found that it works fine otherwise.
Maximising Versions Installation (Thanks to N715DP in the IRC channel.)
2004-09-03 |
Configuration
- obtain from your PPTP Server administrator:
- the IP address or host name of the server,
- the authentication domain name, (e.g. WORKGROUP),
- the username you are to use,
- the password you are to use,
- whether encryption is required.
- run pptp-php-gtk.php or pptpconfig as root, and a window should appear,
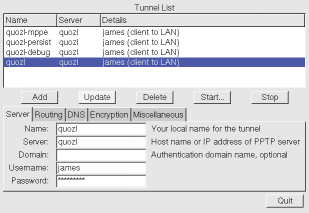
- enter the server, domain, username and password into the Server tab,
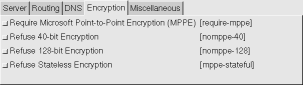
- if you decided in Installation step 1 above that you would need
MPPE, and if your administrator says encryption is required, then on
the Encryption tab, click on Require Microsoft
Point-to-Point Encryption (MPPE),
- click on Add, and the tunnel will appear in the list,
- click on the tunnel to select it, click on Start, and a
window will appear with the tunnel connection log and status,
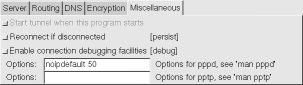
- if the connection fails, you will need to gather more information,
so on the Miscellaneous tab, click on Enable connection
debugging facilities, click Update, try Start again,
then look at the Diagnosis HOWTO for
whatever error is displayed.
- if the connection succeeded, you can try the Ping test
button. If the ping fails, you should try to find out why before
proceeding. If the ping works, then the tunnel is active and you may
now work on routing.
- decide whether all your network traffic should go via the tunnel
or not. If so, Stop the tunnel, select it again, then on the
Routing tab, click on All to Tunnel, then click
Update and try Start again. Now try to access the
network behind the server.
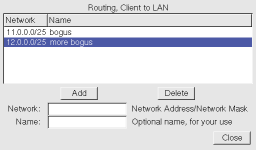
- on the other hand, if only some of your network traffic should go
via the tunnel, you will need to obtain from the server administrator
or folk lore a series of network routes to enter. Stop the
tunnel, select it again, then click on either Client to LAN or
LAN to LAN on the Routing tab, use the Edit Network
Routes button to enter the routes one by one, and then try
Start again. Now try to access the network behind the
server.
For further help with Routing, read our Routing HOWTO.
Comments
If you have comments on this document, please send them to the author at quozl at laptop.org. But if you need help, use the mailing list so that we can share the load.ChangeLog
| Date | Change |
|---|---|
| 2004-09-03 | Revision following IRC discussion. |
| 2004-06-11 | First draft from author. |