Knoppix HOWTO
31st May 2006
These are instructions for installing PPTP Client on Knoppix. The instructions were tested against the Knoppix 4.0.2 DVD.
If you are trying to connect to a Microsoft Windows VPN Server, and it is set to require encryption, then you will need MPPE support in the kernel. If you know you don't, then skip this step.
If the kernel version of your Knoppix is 2.6.15 or later, you already have MPPE support and you can skip this step.
Bob McLaren wrote to us to say that our Debian MPPE DKMS HOWTO should be used on Knoppix, with a few precautions:
- do not attempt to load the kernel-source, because it's already
there,
- when using apt-get to install kernel-ppp-mppe and
dkms, do not install gcc, because the new version of
gcc causes module incompatibility errors which show up in
dmesg,
- after the dkms add step, copy
/var/lib/dkms/kernel_ppp_mppe/1.0.2/source/ppp-comp.h over to
/usr/include/linux/ppp-comp.h otherwise the build will fail
because several definitions are missing.
Installing the Configuration Program
Note: you may wish to skip the configuration program and configure the client by hand.
- add the following lines to the sources
list file, /etc/apt/sources.list :
# James Cameron's PPTP GUI packaging
deb http://quozl.netrek.org/pptp/pptpconfig ./Note: can use a text editor, or simply cat the lines on to the end of the file using >>, but if you make a mistake in formatting you will likely be told by the apt-get update step.
- update the list of packages:
apt-get update - install the PPTP Client GUI:
apt-get install pptpconfig
Configuration
- obtain from your PPTP Server administrator:
- the IP address or host name of the server,
- the authentication domain name, (e.g. WORKGROUP),
- the username you are to use,
- the password you are to use,
- whether encryption is required.
- run pptpconfig as root, and a window should appear,
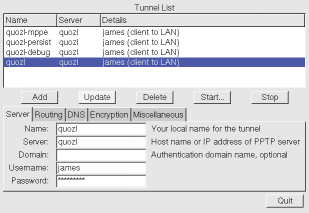
- enter the server, domain, username and password into the Server tab,
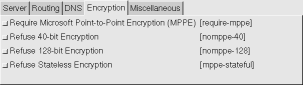
- if you decided in Installation step 1 above that you would need
MPPE, and if your administrator says encryption is required, then on
the Encryption tab, click on Require Microsoft
Point-to-Point Encryption (MPPE),
- click on Add, and the tunnel will appear in the list,
- click on the tunnel to select it, click on Start, and a
window will appear with the tunnel connection log and status,
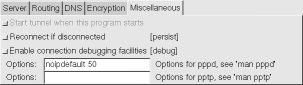
- if the connection fails, you will need to gather more information,
so on the Miscellaneous tab, click on Enable connection
debugging facilities, click Update, try Start again,
then look at the Diagnosis HOWTO for
whatever error is displayed.
- if the connection succeeded, you can try the Ping test
button. If the ping fails, you should try to find out why before
proceeding. If the ping works, then the tunnel is active and you may
now work on routing.
- decide whether all your network traffic should go via the tunnel
or not. If so, Stop the tunnel, select it again, then on the
Routing tab, click on All to Tunnel, then click
Update and try Start again. Now try to access the
network behind the server.
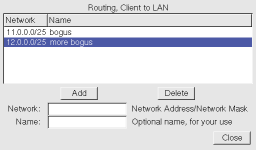
- on the other hand, if only some of your network traffic should go
via the tunnel, you will need to obtain from the server administrator
or folk lore a series of network routes to enter. Stop the
tunnel, select it again, then click on either Client to LAN or
LAN to LAN on the Routing tab, use the Edit Network
Routes button to enter the routes one by one, and then try
Start again. Now try to access the network behind the
server.
For further help with Routing, read our Routing HOWTO.
Diagnosing Problems
If you have problems with the tunnel and need to ask for help, start pppd with complete logging:
| # script pptp.log Script started, file is pptp.log # pppd call tunnelname dump debug logfd 2 nodetach # exit Script done, file is pptp.log |
where tunnelname is the name of the tunnel you created in the configuration program. For more detail, see enabling debug logging.
This will give you a file pptp.log that you can use to search for known solutions in the Diagnosis HOWTO or attach to an e-mail to the mailing list.
- obtain from your PPTP Server administrator:
- the IP address or host name of the server ($SERVER),
- the name you wish to use to refer to the tunnel ($TUNNEL),
- the authentication domain name ($DOMAIN),
- the username you are to use ($USERNAME),
- the password you are to use ($PASSWORD),
- whether encryption is required.
In the steps below, substitute these values manually. For example, where we write $PASSWORD we expect you to replace this with your password.
- create or edit the /etc/ppp/options.pptp file, which sets
options common to all tunnels:
lock noauth nobsdcomp nodeflate
- create or add lines to the /etc/ppp/chap-secrets file,
which holds usernames and passwords:
$DOMAIN\\$USERNAME PPTP $PASSWORD *
Note: if you are using a PPTP Server that does not require an authentication domain name, omit the slashes as well as the domain name.
Note: if the passwords contain any special characters, quote them. See man pppd for more details.
- create a /etc/ppp/peers/$TUNNEL file:
pty "pptp $SERVER --nolaunchpppd"
name $DOMAIN\\$USERNAME
remotename PPTP
require-mppe-128
file /etc/ppp/options.pptp
ipparam $TUNNEL
Note: if you do not need MPPE support, then remove the require-mppe-128 option from this file and /etc/ppp/options.pptp.
- start the tunnel using the pon command:
pon $TUNNEL to further diagnose a failure, add options to the command:
pon $TUNNEL debug dump logfd 2 nodetach Note: we have further information on enabling debug mode, and on diagnosing problems.
- stop the tunnel using the poff command:
poff $TUNNEL - to script the tunnel connection so that something is done as soon
as the tunnel is up, use either ip-up.d scripts or the
updetach keyword.
- see the Routing HOWTO
for examples of ip-up.d scripting that adds routes or
iptables rules.
- using updetach will cause pppd to fork, detach,
and exit with success once the network link is up. This example
connects a provider link, then the tunnel, then runs
fetchmail to get new e-mail:
pon provider updetach && pon $TUNNEL updetach && fetchmail Note: the double ampersand && means that the commands following it will only be executed if the command to the left of it was successful. If the tunnel fails to connect, the fetchmail will not happen.
- see the Routing HOWTO
for examples of ip-up.d scripting that adds routes or
iptables rules.
- to have the tunnel automatically restarted if it fails, add the option
persist to either the command line or the
/etc/ppp/peers/$TUNNEL file.
- to have a tunnel started on system boot,
add to the file /etc/network/interfaces this iface stanza: iface tunnel inet ppp
provider $TUNNELand edit the iface stanza for your default network connection, usually eth0, to connect the tunnel when possible:
auto eth0
iface eth0 inet dhcp
post-up /sbin/ifup tunnel
pre-down /sbin/ifdown tunnelNote: this eliminates a race between the tunnel startup and the default network connection, which can prevent tunnel connection.
2017-01-26
- to set up routing, read our Routing
HOWTO, or use Network Manager.
Comments
If you have comments on this document, please send them to the author at quozl at laptop.org. But if you need help, use the mailing list so that we can share the load.ChangeLog
| Date | Change |
|---|---|
| 2006-05-31 | Admit which version of Knoppix this relates to. |
| 2006-05-29 | Derive from Debian HOWTO. |